
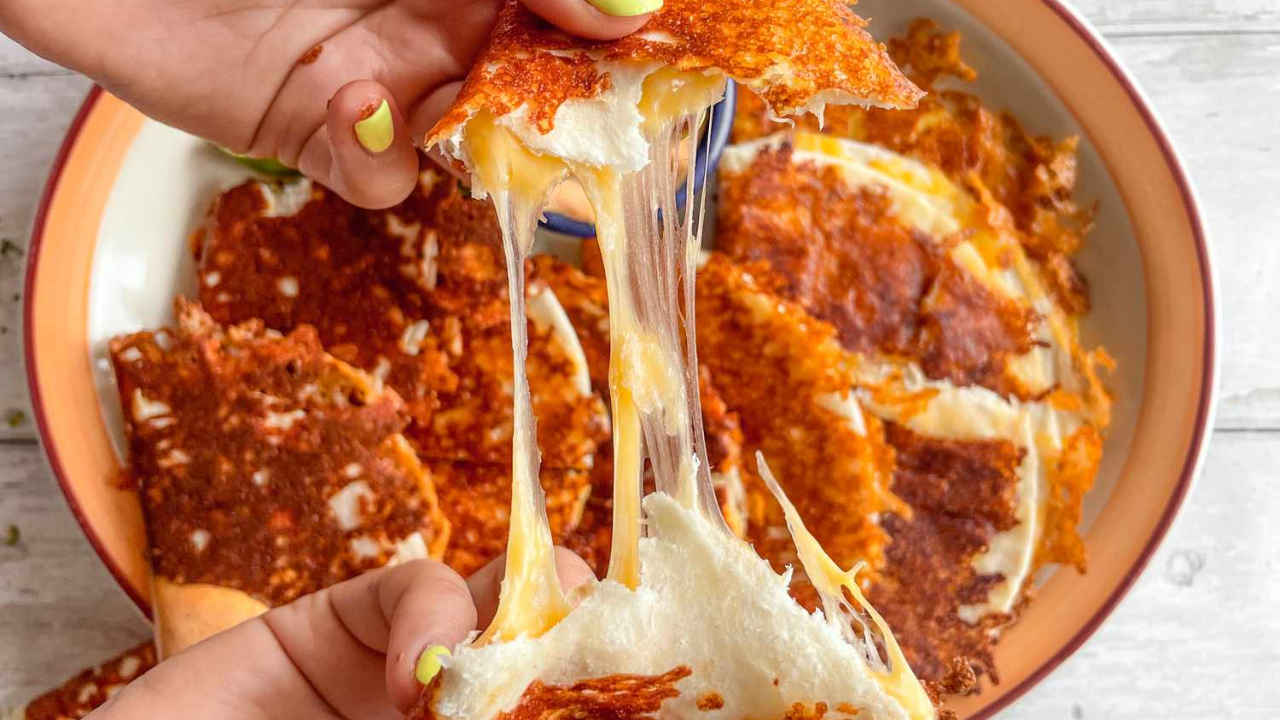
If there is one universal truth that unites food lovers everywhere, it’s this: crispy, almost-burnt cheese is pure magic. When cheese hits a hot pan and cooks just a little longer than expected, it transforms into something deeply savory, crunchy, nutty, and outrageously satisfying. That exact transformation is what makes burnt cheese tacos one of the most addictive taco variations you’ll ever try.
These tacos are not about subtlety. They’re bold, crunchy, cheesy, and unapologetically indulgent. Instead of cheese being a quiet supporting character inside the tortilla, it becomes the star—forming a golden, crackly crust that wraps around the taco and delivers flavor in every single bite.
This recipe, inspired by the genius simplicity popularized by Sara Tane, proves that you don’t need fancy ingredients or complex techniques to create a show-stopping dish. All you really need are cheese, tortillas, and a little patience.
Why Burnt Cheese Tacos Are So Good
Burnt cheese tacos work because of contrast. You get:
- A deeply crisp, caramelized cheese exterior
- A soft, warm tortilla inside
- A gooey, melty cheese center
- Optional fillings that add texture and heartiness
As the cheese cooks directly on the skillet, it releases fat and moisture, forming a lacy, crunchy layer with intense umami flavor. Folded around a tortilla, it becomes a shell-meets-filling situation that feels both rustic and gourmet.
This is comfort food turned up to eleven.
Best Cheese for Burnt Cheese Tacos
The key to success lies in choosing the right cheese. You want something that melts well but also browns beautifully.
Top Cheese Choices
- Mexican blend (cheddar, Monterey Jack, quesadilla cheese) – best overall
- Cheddar – bold flavor and excellent browning
- Monterey Jack – creamy and mild
- Pepper Jack – adds a spicy kick
- Mozzarella – great melt, milder flavor (best mixed with another cheese)
Pre-shredded cheese works perfectly here and saves time, but freshly grated cheese will give you slightly better melt and browning.
Corn vs Flour Tortillas
Both tortillas work, so this comes down to preference:
- Corn tortillas:
- Traditional taco size
- Slightly firmer bite
- Excellent contrast with crispy cheese
- Fajita-style flour tortillas:
- Soft and flexible
- Easier to fold
- Slightly richer taste
Whichever you choose, aim for 6-inch tortillas so they fit neatly inside the cheese circle.
The Chipotle Dipping Sauce (Don’t Skip This)
While burnt cheese tacos are incredible on their own, the chipotle dipping sauce takes them to another level. Creamy, smoky, tangy, and spicy—it cuts through the richness of the cheese perfectly.
What Makes It Special
- Mayonnaise provides richness
- Chipotle in adobo brings smoky heat
- Fresh lime juice adds brightness
- Salt balances everything out
You can easily customize the heat level by adding more or less chipotle. Love spice? Go heavy. Prefer mild? Start small.
Ingredients
For the Chipotle Sauce
- ½ cup mayonnaise
- 2 tablespoons canned chipotle in adobo sauce (more to taste)
- 1 tablespoon fresh lime juice
- ½ teaspoon kosher salt
For the Tacos
- Nonstick cooking spray
- 3½ cups shredded Mexican-blend cheese, divided
- 6 (6-inch) corn or fajita-style flour tortillas
Step-by-Step: How to Make Burnt Cheese Tacos
1. Make the Chipotle Sauce
In a small bowl, whisk together mayonnaise, chipotle in adobo, lime juice, and salt. Taste and adjust seasoning or heat level as needed. Set aside.
2. Heat the Skillet
Place a large nonstick skillet over medium heat and lightly coat with cooking spray. A well-seasoned cast iron pan also works, but nonstick makes flipping easier.
3. Create the Cheese Circle
Sprinkle ⅓ cup of shredded cheese directly onto the hot skillet in a 6-inch circle. Don’t worry about small gaps—those will melt together.
4. Add the Tortilla
Lay one tortilla directly on top of the melting cheese. You should still see cheese bubbling around the edges.
Sprinkle ¼ cup cheese on one half of the tortilla only. This becomes the melty interior.
5. Let the Cheese Get Golden
Cook for about 2 minutes, until the cheese touching the skillet turns deep golden brown. This is the crucial step—don’t rush it. If the cheese darkens too quickly, lower the heat slightly.
6. Fold and Seal
Using a rubber spatula, gently lift the crispy cheese edge and fold the bare half of the tortilla over the cheesy half. Press lightly so the melted cheese seals the taco shut.
7. Finish Cooking
Cook another 2 minutes, flipping once if needed, until both sides are crisp and the center is fully melted.
Repeat with remaining tortillas.
Filling Ideas: Stuff ’Em Your Way
These tacos are amazing with just cheese, but they’re also a perfect canvas for fillings.
Savory Add-Ins
- Refried beans
- Black beans
- Scrambled eggs
- Crispy tater tots
- Sautéed mushrooms
- Cooked chicken
- Crumbled chorizo
- Seared steak
Add fillings sparingly—you don’t want to overwhelm the cheese or prevent proper sealing.
Serving Suggestions
Serve burnt cheese tacos immediately while they’re hot and crispy. Pair them with:
- Chipotle dipping sauce
- Fresh salsa
- Sour cream
- Lime wedges
- Sliced avocado or guacamole
They’re perfect as:
- A weekend breakfast
- A late-night snack
- A party appetizer
- A quick comfort-food dinner
Storage & Reheating Tips
While best eaten fresh, leftovers can be stored:
- Refrigerate in an airtight container for up to 5 days
- Reheat in a hot skillet to re-crisp the cheese
- Avoid the microwave—it softens the crust
Final Thoughts
Burnt cheese tacos are proof that sometimes the best recipes come from leaning into imperfection. Cooking the cheese just a bit longer creates unmatched flavor and texture—crispy, gooey, salty, and deeply satisfying.
With only a few ingredients and endless customization options, this is a recipe you’ll come back to again and again. Once you experience that first crunchy bite, you’ll understand why burnt cheese deserves its own culinary fan club.
If you love bold flavors, minimal effort, and maximum reward—burnt cheese tacos belong in your kitchen. 🌮🧀