
A truly great ham and cheese sandwich has the power to turn a forgettable lunch into something deeply comforting and satisfying. When done right, it’s crisp on the outside, molten in the middle, and perfectly balanced between salty, tangy, rich, and savory. This isn’t the cold, soggy lunchbox sandwich many of us endured growing up. This is the grown-up, hot-and-melty version—the kind that demands a skillet, quality ingredients, and a little patience.
This recipe is built around thoughtful technique rather than excess. By choosing the right ham, a cheese that melts beautifully, sturdy bread, and using a press while cooking, you get a sandwich that’s cohesive, indulgent, and downright crave-worthy. It’s proof that even the most familiar foods deserve care and intention.
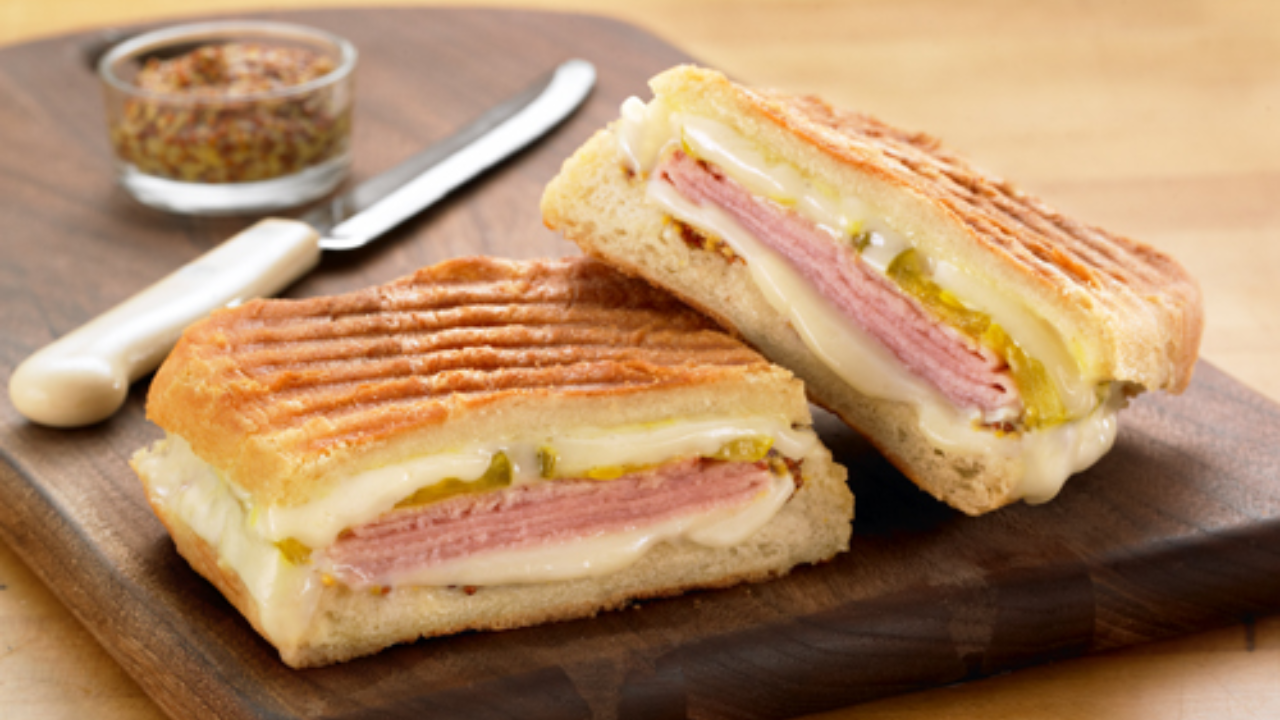
Why This Ham and Cheese Sandwich Works So Well
This sandwich succeeds because every element plays a specific role:
- Thinly sliced, high-quality ham delivers savory flavor without overwhelming the bite
- Swiss or Gruyère cheese melts smoothly and brings tangy depth
- Mayonnaise acts as both flavor booster and browning agent
- Pressing the sandwich ensures even heat and proper melting
- Resting after cooking keeps the cheese inside where it belongs
The result is a sandwich that’s crisp, gooey, and stable—no sliding fillings, no soggy bread, no regrets.
A Brief Look at the Ham and Cheese Sandwich’s Rise
The ham sandwich has been part of American food culture since the 19th century, long before it became a lunchbox staple. Early cookbooks from the 1800s describe simple preparations of buttered bread, mustard, and thinly sliced ham. Over time, the sandwich became more accessible thanks to the rise of pre-sliced bread and deli meats, cementing its place as a quick, portable meal.
While many global cuisines boast iconic ham sandwiches—from France’s croque monsieur to Cuba’s Cubano—the American ham and cheese evolved into something straightforward and familiar. Yet familiarity often leads to neglect. This recipe revisits the sandwich with fresh eyes, proving that simplicity doesn’t have to mean mediocrity.
The Keys to a Perfect Hot Ham and Cheese
1. Use Good Ham—and Plenty of It
This isn’t a grilled cheese with ham as an afterthought. The ham should be the star. About three ounces per sandwich is the sweet spot: enough to deliver bold flavor without making the sandwich unwieldy.
Always opt for freshly sliced deli ham, cut very thin. Thin slices fold and layer more easily, warm evenly, and create a tender bite once pressed and grilled. Look for ham that’s moist but not slimy, with a clean aroma and balanced seasoning.
2. Choose a Cheese That Melts Beautifully
Not all cheeses belong in a skillet sandwich. Skip dry or crumbly varieties and choose something that melts smoothly. Swiss and Gruyère are ideal thanks to their nutty, tangy flavor and excellent melt. Thinly sliced cheddar also works well if you prefer a sharper profile.
The goal is for the cheese to melt into both the bread and the ham, acting as edible glue that holds the sandwich together.
3. Pick the Right Bread
Flat, sturdy slices are essential. Bread with a wide surface area ensures even contact with the skillet, which means better browning. Aim for slices about ½-inch thick—thick enough to hold the filling but not so dense that it overwhelms the sandwich.
Rustic white bread, marble rye, or pumpernickel all work well. Avoid baguettes or rolls, which don’t toast evenly in a pan.
4. Use Mayonnaise—Inside and Out
Mayonnaise plays a dual role here. Spread lightly on the inside of the bread, it adds tang and helps anchor the fillings. On the outside, it replaces butter as the toasting fat, delivering a deeply golden crust with minimal effort.
Unlike butter, mayo spreads easily straight from the fridge and browns evenly without burning.
5. Layer with Intention
How you stack the sandwich matters. The most stable build goes like this:
- Bread with interior mayo
- Half the cheese
- Ham
- Pickles (optional)
- Remaining cheese
- Top slice of bread with mayo and mustard
This structure ensures the cheese melts into the bread and ham from both sides, keeping everything neatly contained.
6. Press While Cooking
A hot skillet alone isn’t enough. Weighing the sandwich down with a Dutch oven or heavy pan ensures even heat distribution. This helps the cheese melt fully before the bread overbrowns and compresses the fillings into a cohesive layer.
Cook over medium to medium-low heat, flipping once, and press gently but firmly.
7. Let It Rest
This step is non-negotiable. After cooking, transfer the sandwich to a wire rack and let it rest for about five minutes. This allows the cheese to set slightly and prevents it from spilling out when sliced.
Resting on a rack—not a plate—keeps steam from softening the crust, preserving that hard-earned crunch.
Ingredients You’ll Need
- Crusty sandwich bread (½-inch thick slices)
- Mayonnaise (or softened butter)
- Dijon mustard
- Swiss, Gruyère, or cheddar cheese, thinly sliced
- Thinly sliced deli ham
- Pickle chips (optional)
- Freshly ground black pepper
How to Make the Ultimate Ham and Cheese Sandwich
- Prepare the bread: Spread mayonnaise on one side of each slice.
- Start cooking: Place two slices mayo-side down in a skillet over medium heat. Spread mayo on the exposed sides.
- Layer fillings: Add cheese, ham, pickles, more cheese, then top with remaining bread slices spread with mayo and mustard.
- Grill and flip: Cook until golden, then flip carefully.
- Press and finish: Place a heavy pan on top, lower heat, and cook until the cheese melts completely.
- Rest: Transfer to a wire rack for 5 minutes.
- Slice and serve: Cut in half and enjoy warm.
Variations to Try
- Cold version: Skip the skillet and enjoy it as a classic deli sandwich
- Butter swap: Use butter instead of mayo for a richer crust
- Spicy kick: Add banana peppers or chili crisp
- Different meats: Turkey, roast pork, or a mix of deli meats work beautifully
Final Thoughts
A ham and cheese sandwich may seem simple, but when treated with care, it becomes something exceptional. With crisp bread, melty cheese, savory ham, and smart technique, this version delivers everything a comfort sandwich should. It’s warm, nostalgic, and deeply satisfying—exactly what lunch should be.